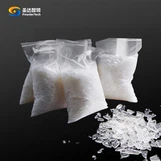
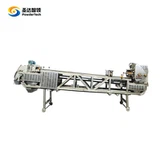
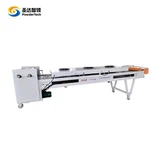
In the realm of industrial operations, cooling belts play a pivotal role in ensuring the efficient and safe processing of various materials. As a reputable Cooling Belt supplier, I understand the significance of maintaining these systems in optimal condition. One crucial aspect of this maintenance is the replacement of cooling elements in a belt. This process not only extends the lifespan of the belt but also enhances its performance, leading to increased productivity and reduced downtime. In this blog post, I will guide you through the steps of replacing the cooling elements in a belt, providing you with the knowledge and confidence to tackle this task effectively.
Understanding the Cooling Elements in a Belt
Before delving into the replacement process, it is essential to understand the role and types of cooling elements used in belts. Cooling elements are designed to dissipate heat generated during the operation of the belt, preventing overheating and ensuring the stability of the materials being processed. There are several types of cooling elements commonly used in belts, including air cooling systems, water cooling systems, and refrigerant-based cooling systems.
- Air Cooling Systems: These systems use fans or blowers to circulate air over the belt, carrying away heat and maintaining a lower temperature. Air cooling is a cost-effective and energy-efficient solution, making it a popular choice for many applications. For more information on air cooling belt conveyors, you can visit Air Cooling Belt Conveyor.
- Water Cooling Systems: Water cooling systems use water as a coolant, circulating it through pipes or channels in the belt to absorb heat. This method is more efficient than air cooling and can provide precise temperature control. However, it requires a reliable water supply and proper maintenance to prevent corrosion and leaks.
- Refrigerant-Based Cooling Systems: These systems use refrigerants to cool the belt, providing the most efficient and precise temperature control. Refrigerant-based cooling systems are commonly used in high-temperature applications where precise temperature control is critical. However, they are more complex and expensive to install and maintain compared to air and water cooling systems.
Signs That Your Cooling Elements Need Replacement
Over time, cooling elements can wear out or become damaged, leading to reduced cooling efficiency and potential system failures. It is important to regularly inspect your cooling belt for signs of wear and tear and replace the cooling elements as needed. Here are some common signs that your cooling elements may need replacement:


- Reduced Cooling Efficiency: If you notice that your belt is not cooling as effectively as it used to, it may be a sign that the cooling elements are not functioning properly. This can result in higher temperatures, which can damage the materials being processed and reduce the lifespan of the belt.
- Unusual Noises or Vibrations: Unusual noises or vibrations coming from the cooling system can indicate a problem with the cooling elements. This could be due to a loose or damaged fan, a clogged air duct, or a malfunctioning pump.
- Visible Damage: Inspect the cooling elements for visible signs of damage, such as cracks, leaks, or corrosion. If you notice any damage, it is important to replace the affected elements immediately to prevent further damage to the belt.
- Increased Energy Consumption: If you notice a significant increase in your energy consumption, it may be a sign that the cooling system is working harder than usual to maintain the desired temperature. This could be due to a malfunctioning cooling element or a problem with the control system.
Steps to Replace the Cooling Elements in a Belt
Replacing the cooling elements in a belt requires careful planning and preparation to ensure a safe and successful installation. Here are the general steps to follow when replacing the cooling elements in a belt:
Step 1: Gather the Necessary Tools and Materials
Before you begin the replacement process, gather all the necessary tools and materials. This may include wrenches, screwdrivers, pliers, a multimeter, replacement cooling elements, and any other components or accessories required for the installation.
Step 2: Turn Off the Power and Disconnect the Belt
To ensure your safety, turn off the power to the cooling belt and disconnect it from the power source. This will prevent any electrical shocks or injuries during the replacement process.
Step 3: Remove the Old Cooling Elements
Carefully remove the old cooling elements from the belt. This may involve removing screws, bolts, or clips that hold the elements in place. Be sure to keep track of all the components and hardware removed during this process.
Step 4: Clean the Belt and Installation Area
Once the old cooling elements have been removed, clean the belt and the installation area to remove any dirt, debris, or residue. This will ensure a proper fit and installation of the new cooling elements.
Step 5: Install the New Cooling Elements
Install the new cooling elements in the same position as the old ones. Make sure the elements are securely fastened and aligned properly. Connect any electrical or plumbing connections as required.
Step 6: Test the Cooling System
After the new cooling elements have been installed, turn on the power and test the cooling system to ensure it is functioning properly. Check for any leaks, unusual noises, or vibrations, and monitor the temperature of the belt to ensure it is within the desired range.
Step 7: Reconnect the Belt and Resume Operation
Once you have confirmed that the cooling system is working properly, reconnect the belt to the power source and resume normal operation. Monitor the belt closely for the first few hours to ensure everything is functioning as expected.
Tips for a Successful Replacement
- Follow the Manufacturer's Instructions: Always refer to the manufacturer's instructions and guidelines when replacing the cooling elements in a belt. This will ensure that you install the elements correctly and avoid any potential problems.
- Use the Right Tools and Materials: Using the right tools and materials is essential for a successful replacement. Make sure you have all the necessary tools and use high-quality replacement parts to ensure the longevity and performance of the cooling system.
- Take Safety Precautions: Replacing the cooling elements in a belt can be dangerous if proper safety precautions are not taken. Always wear appropriate safety gear, such as gloves and safety glasses, and follow all safety procedures to prevent injuries.
- Keep Records: Keep records of the replacement process, including the date of replacement, the type of cooling elements used, and any other relevant information. This will help you track the maintenance history of the belt and ensure that it is properly maintained in the future.
Conclusion
Replacing the cooling elements in a belt is an important part of maintaining the efficiency and performance of your cooling system. By following the steps outlined in this blog post and taking the necessary precautions, you can ensure a safe and successful replacement process. As a Cooling Belt supplier, I am committed to providing high-quality cooling solutions and excellent customer service. If you have any questions or need assistance with replacing the cooling elements in your belt, please do not hesitate to contact me. I look forward to helping you optimize the performance of your cooling belt and improve your industrial operations.
References
- Manufacturer's manuals and guidelines for cooling belts and cooling elements.
- Industry standards and best practices for cooling system maintenance and repair.